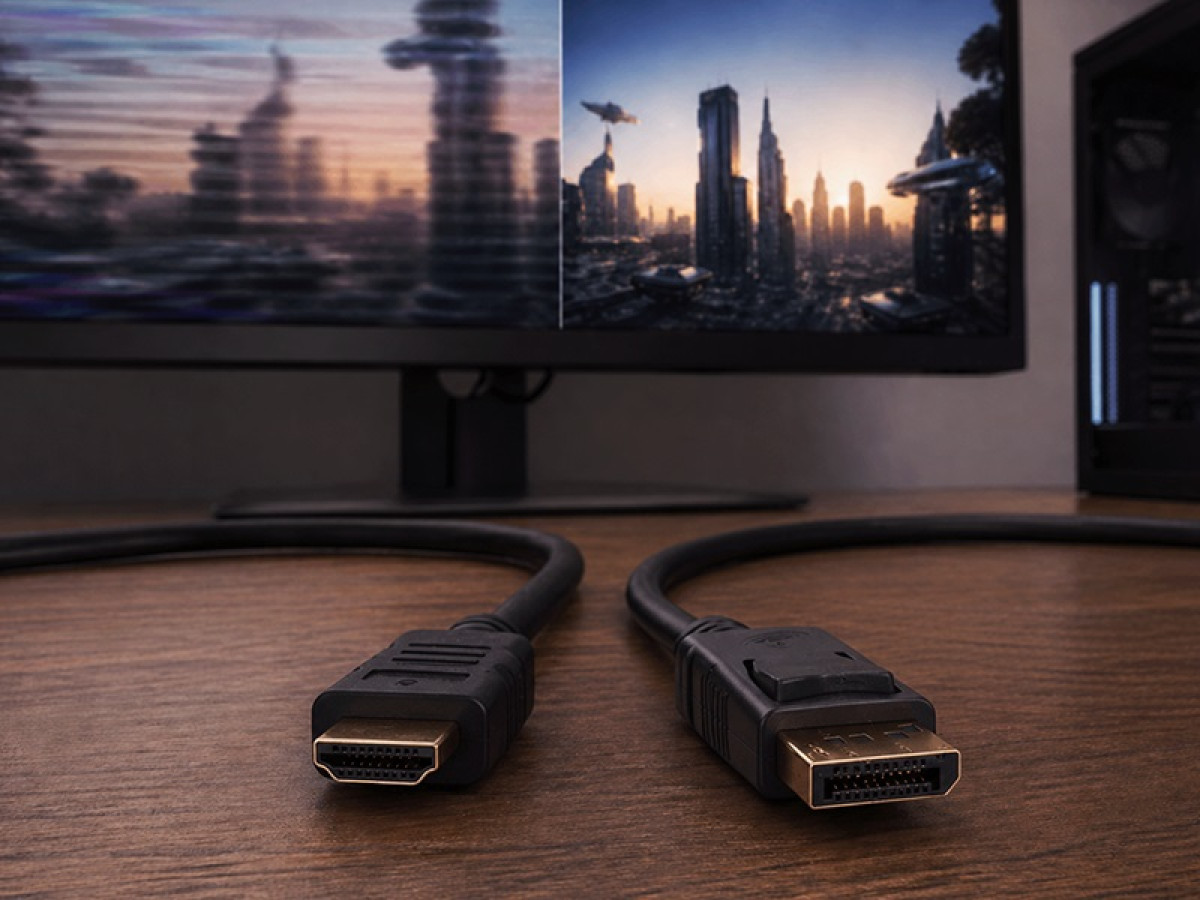
A laptop's small screen isn't suited to everything. So sooner or later the thought comes up to connect a separate monitor, and it really does change a lot. A large screen makes it more comfortable to work with documents, spreadsheets, the browser, and messengers, and there's room to arrange windows when you have many of them. You can raise it to eye level, and your back and neck will thank you. And the laptop itself turns into a compact system unit: you add a display, a keyboard, and a mouse to it – and you get a full-fledged workspace.
All that's left is to figure out how to connect a monitor to a laptop correctly. After all, there are quite a few ports and cables out there: HDMI, DisplayPort, USB-C and Thunderbolt, plus the older VGA and DVI, various converters, adapters, and docking stations. Add to that the MacBook with its quirks, the settings in Windows and macOS, and typical problems like “no signal” – and it becomes clear why it's easy to get confused here.
So, next up: which port your laptop has, which cable or adapter you need, how to set up the image, and what to do if the display doesn't work.
The main connectors for connecting a monitor to a laptop
Before rushing off for a cable, it's worth sorting out the ports, because they determine what you'll need. Look at the side edges of the laptop and the monitor and note:
- which connector the laptop has;
- which connector the display has;
- what image you want to get: resolution and refresh rate.
It's also important what needs to be transmitted: video only, or also sound, power, and USB devices. Most often you'll come across a few main connectors, and you'll easily recognise yours now.
HDMI – the most common option
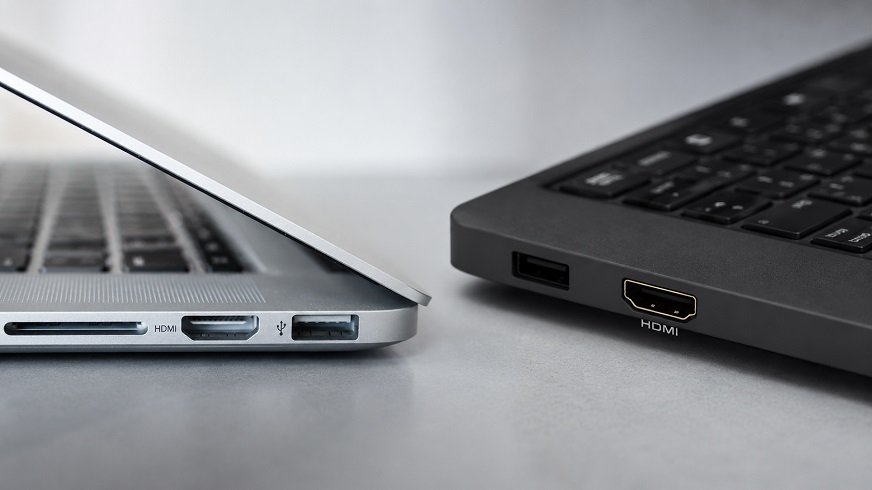
This is the connector almost everyone has seen. HDMI carries both video and sound at once, so no extra wires are needed. It's on most devices, which is why a connection most often starts with it. That said, thin laptops may leave it out to save space. Also keep in mind that HDMI comes in different sizes:
- full-size;
- mini HDMI;
- micro HDMI.
There's one point that confuses many people. The labels HDMI 1.4, 2.0, or 2.1 aren't the shape of the connector but its bandwidth – that is, the amount of data it can transmit. So if a cable physically won't fit into the socket, it's not about the version but about the connector type, or the port being damaged.
DisplayPort – for gaming and professional monitors
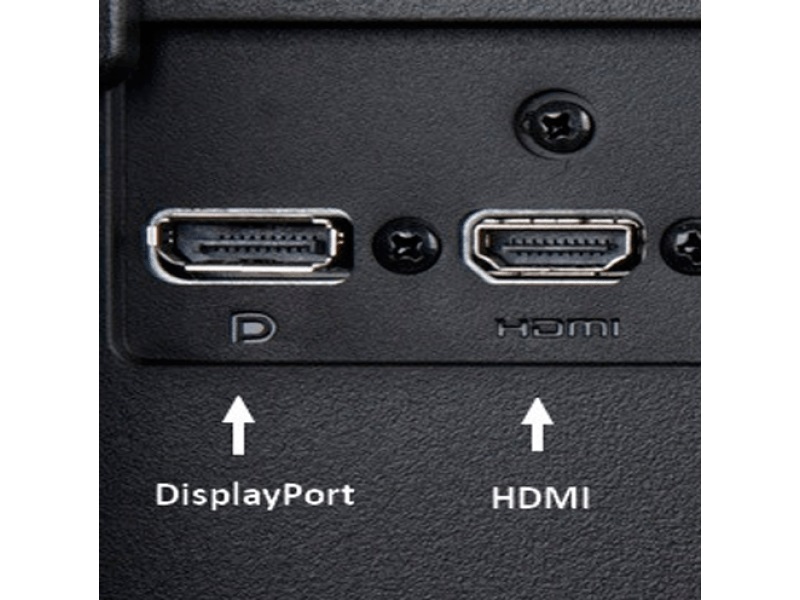
DisplayPort is most often found on displays, docking stations, and desktop computers, whereas it's installed on laptops less often. Its strength is that it handles high resolution and a high refresh rate well, which is why gamers and people who work with graphics like it. Like HDMI, it comes in two sizes:
- full-size DisplayPort;
- the smaller mini DisplayPort.
By the way, when video is transmitted over USB-C, most often it's the DisplayPort technology behind it, called DisplayPort Alt Mode.
USB-C / Thunderbolt – when Type-C can transmit video
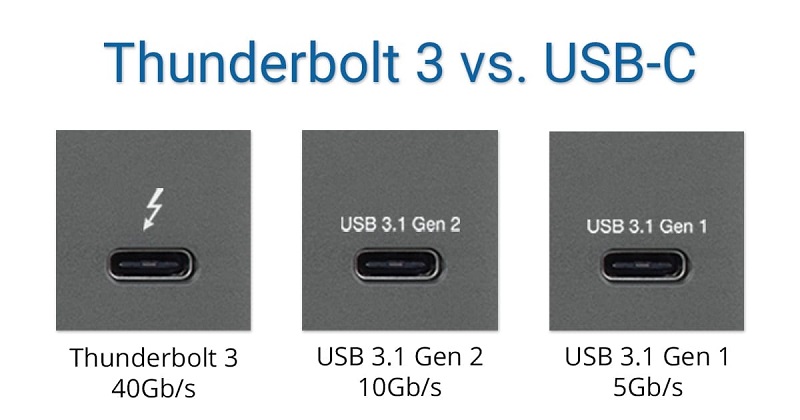
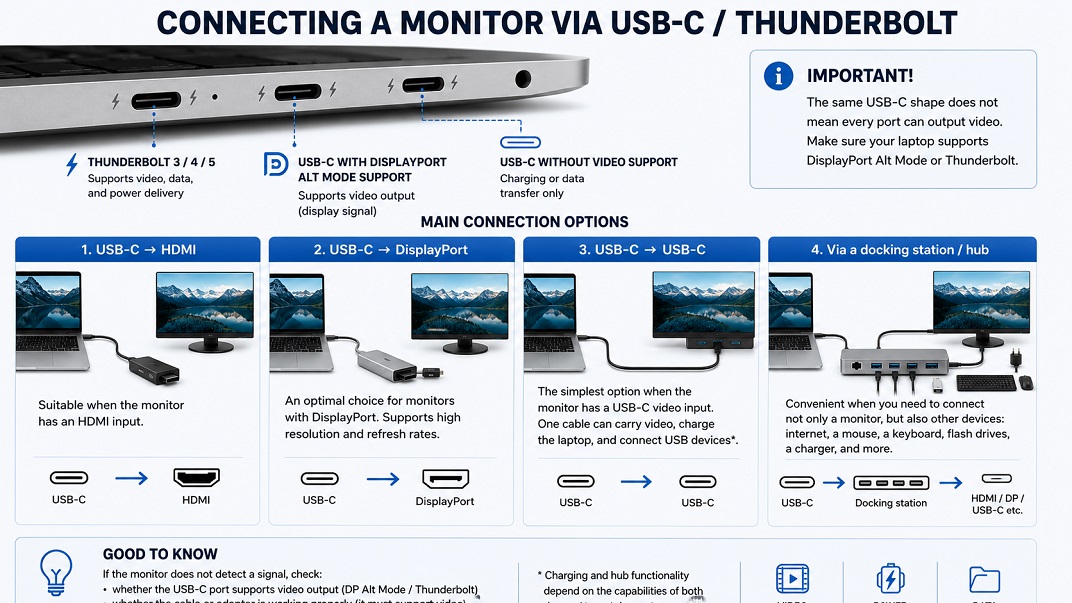
And here's where the most confusion begins. Many people see a USB-C connector, also called Type-C, and think it can definitely output an image. But that's not always the case. The shape of the connector alone guarantees nothing. For video to go through it, the port must support one of the technologies: DisplayPort Alt Mode, Thunderbolt 3, Thunderbolt 4, or video output via USB4.
A hint can be the icon next to the port: for example, a lightning bolt or a DP label. But the most reliable thing is to check the specifications of your particular laptop model. Besides, the USB-C cable you charge your phone with may not transmit an image at all.
This topic is fairly tangled. If you want to get to grips with it and choose the right cable, it's all gathered in a separate Recorder guide: USB-C, USB4, and Thunderbolt – how to choose a cable or docking station.
VGA and DVI – old interfaces
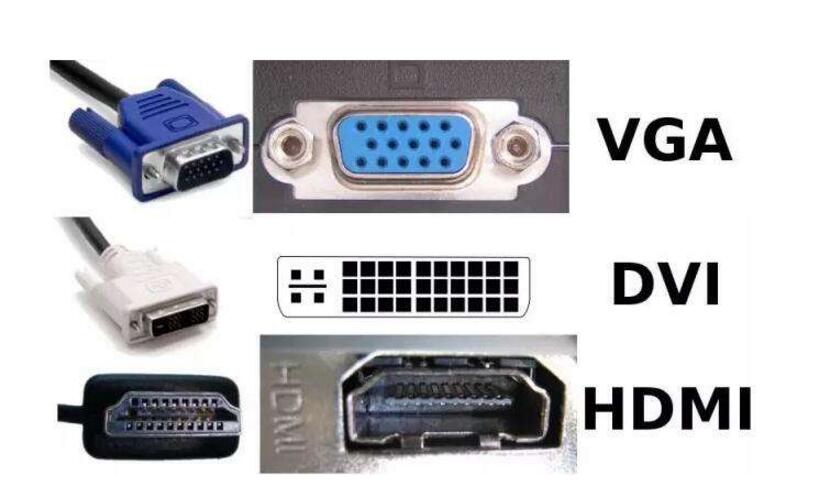
These two connectors can still be found on old laptops, monitors, and projectors. VGA transmits an analogue signal, so the image is no longer as sharp, especially at Full HD resolution and above. It doesn't transmit sound at all, so a separate cable is needed for audio. DVI can be either digital or analogue, depending on the type. And if you need to connect, say, VGA to HDMI, a simple adapter won't do: here you need an active converter that converts the signal from one format to another.
That's all the main connectors. The simplest case is when the laptop and monitor have the same port: then an ordinary cable is enough. And if they're different, you'll need an adapter. More on that next.
How to connect a monitor to a laptop via HDMI
This is the most common method, which most people come across. If both the laptop and the display have HDMI, consider yourself lucky. Because it's all done in a couple of minutes:
- Check whether both devices have an HDMI connector.
- Plug one end of the HDMI cable into the laptop.
- Connect the other end to the display.
- Turn on both devices.
- On the display, select the correct signal source, i.e. the Input Source. This is usually done with a button on the body or through the settings menu.
- On a Windows laptop, press Win + P and choose the display mode you need.
- If necessary, go into the display settings and check the resolution, scale, and refresh rate.
Usually HDMI, DisplayPort, and USB-C let you connect a monitor “hot” – that is, you don't need to turn off the laptop to do it. But if the image stubbornly won't appear, try it differently: turn off both devices, connect them with the cable, and turn them on again. This often helps.
If the HDMI cable physically doesn't fit
Sometimes the cable simply won't go into the socket. There can be several reasons:
- one of the devices has not a full-size HDMI but a smaller mini HDMI or micro HDMI;
- the connector is easy to confuse with DisplayPort because they look alike;
- the port itself is damaged;
- the cable is being plugged into the wrong connector.
And the HDMI version has no effect at all on the shape of the socket. The cable won't fit – that means the wrong connector type has been chosen, and that's it.
But most often there are no difficulties with HDMI. You connect the cable, select the signal source, and you already see the image.
How to connect a monitor to a laptop without HDMI
So what do you do if the laptop has no HDMI? This situation is familiar to owners of ultrabooks, MacBooks, thin office models, or, on the contrary, quite old laptops. It's not a problem: there are plenty of options without it.
Connecting via USB-C / Thunderbolt
Most often USB-C comes to the rescue, especially if the port supports video. The main options:
- USB-C → HDMI – suitable when the monitor has an HDMI input. Usually a USB-C/Thunderbolt → HDMI cable or adapter is used.
- USB-C → DisplayPort – a good option for monitors with DisplayPort. This method is often chosen for high resolution or an increased refresh rate.
- USB-C → USB-C – a convenient solution if the monitor has a full-fledged USB-C video input. A single cable can transmit the image, charge the laptop, and connect USB devices, but only provided these functions are supported on both sides.
- Via a docking station or USB-C hub – suitable when you need to connect a monitor, charger, keyboard, mouse, network cable, and other devices to the laptop at the same time.
But if the USB-C port itself can't transmit video, none of these cables will work. Then look for another video output or choose a docking station with DisplayLink technology. We'll talk about it further on.
Adapters and converters: why the direction of the signal matters
And this is where people often trip up. Adapters can be passive or active, and not every one works in both directions. That is, an adapter that connects the connectors one way may not work the other way. It looks like this:
- USB-C → HDMI works only when USB-C supports video.
- DisplayPort → HDMI sometimes works through a simple adapter, but that depends on support for Dual-Mode DisplayPort, also labelled as DP++. If the laptop's or the adapter's specifications don't list such compatibility, an active adapter may be needed.
- HDMI → DisplayPort usually requires an active adapter with a separate power supply.
- HDMI → VGA works only through an active converter.
- VGA → HDMI also requires an active converter, and the direction matters here.
So before buying, look not only at the connectors but also at which direction the adapter works. HDMI → VGA and VGA → HDMI are completely different things, and one adapter won't always replace the other.
Which cable or adapter you need
Before buying a cable, adapter, or docking station, find out five things:
- The exact model of the laptop or MacBook.
- Which port the laptop has and which input the monitor has.
- Which mode you need: Full HD 60 Hz, QHD 144 Hz, 4K 60 Hz, 4K 144 Hz, and so on.
- Whether you need one monitor or two independent screens.
- Whether the docking station should charge the laptop and how much Power Delivery power is enough for you.
| Port on the laptop → Port on the monitor | What you need | What to check |
| HDMI on the laptop → HDMI on the monitor | HDMI cable | Whether both devices support the required 4K resolution and refresh rate |
| USB-C with video output → HDMI | USB-C → HDMI cable or adapter | DP Alt Mode or Thunderbolt support, the required resolution and refresh rate |
| USB-C with video output → DisplayPort | USB-C → DisplayPort cable | The DisplayPort version and support for the required monitor mode |
| HDMI → DisplayPort | Active HDMI → DisplayPort adapter | Signal direction, adapter power requirements, 4K support and the required refresh rate |
| USB-C without video output → HDMI or DisplayPort | DisplayLink docking station or adapter | Driver availability, OS compatibility, maximum resolution and refresh rate |
| Two monitors | A docking station, a Thunderbolt solution, or two separate video outputs | The laptop's monitor limit, macOS or Windows limitations, MST or DisplayLink support |
| DisplayPort → HDMI | DisplayPort → HDMI cable or adapter | A DP++ / Dual-Mode DisplayPort output. If it is not supported, an active adapter may be required |
Docking stations and USB hubs
Sometimes you need to connect to the laptop not only a monitor but also a keyboard, a mouse, a charger, an internet cable, flash drives, or speakers. In such a situation it's convenient to use a USB-C hub or a docking station. They connect to the laptop with a single cable and add the necessary connectors for peripherals.
A USB-C hub is usually more compact. It may have HDMI or DisplayPort for the monitor, several USB ports, a card reader, Ethernet, and a USB-C port for charging the laptop. A docking station often has more ports and is better suited to a permanent workspace, especially when you need to connect several devices or two external monitors.
But it's not only the name of the device that matters. Before buying, check its specifications:
- which resolution and refresh rate it supports. For example, Full HD 60 Hz, 4K 30 Hz, or 4K 60 Hz;
- whether it can output the image to one or several independent monitors;
- whether it supports charging the laptop via Power Delivery, and at what power;
- whether it's compatible specifically with your version of Windows or macOS;
- whether DisplayLink is needed, if the laptop doesn't support several displays through an ordinary video output.
MacBook owners should be especially attentive: some hubs and docking stations have two video outputs, but without DisplayLink they may duplicate the image on both monitors rather than extend the desktop.
So even when the laptop has no HDMI, there are plenty of options. The main thing is to check the capabilities of the laptop's port, the monitor, and the hub or docking station itself before buying.
How to connect an external monitor to a MacBook Air or MacBook Pro
The MacBook has its own subtleties, so we'll cover it separately. Modern models almost always have USB-C / Thunderbolt connectors, and the familiar HDMI is missing on many of them, though on the newer MacBook Pro it has returned. So the cable is chosen by the input on the display: HDMI, DisplayPort, or USB-C. And which exact pair of ports to connect is shown by the table above – it works for the Mac too.
Features of MacBooks on Apple Silicon
And here's where the most important thing begins, which many people don't suspect. The number of external displays for a MacBook depends on the model and its chip, and that's no small matter.
The basic MacBook Air and some MacBook Pro models on M1 and M2 chips support only one external screen. That is, they simply won't see a second monitor. On M3 models the situation is better: they already support two displays, but often on the condition that the laptop lid has to be closed.
And models on M4 and newer basic MacBooks are able to work with two external displays even with the lid open. More powerful versions with Pro or Max chips may have even more capabilities, but the exact limit depends on the specific model.
So don't believe general phrases like “all MacBooks support only one monitor.” It all depends on the specific model, so before buying a monitor or a docking station, check the specifications of your own laptop.
DisplayLink for MacBook
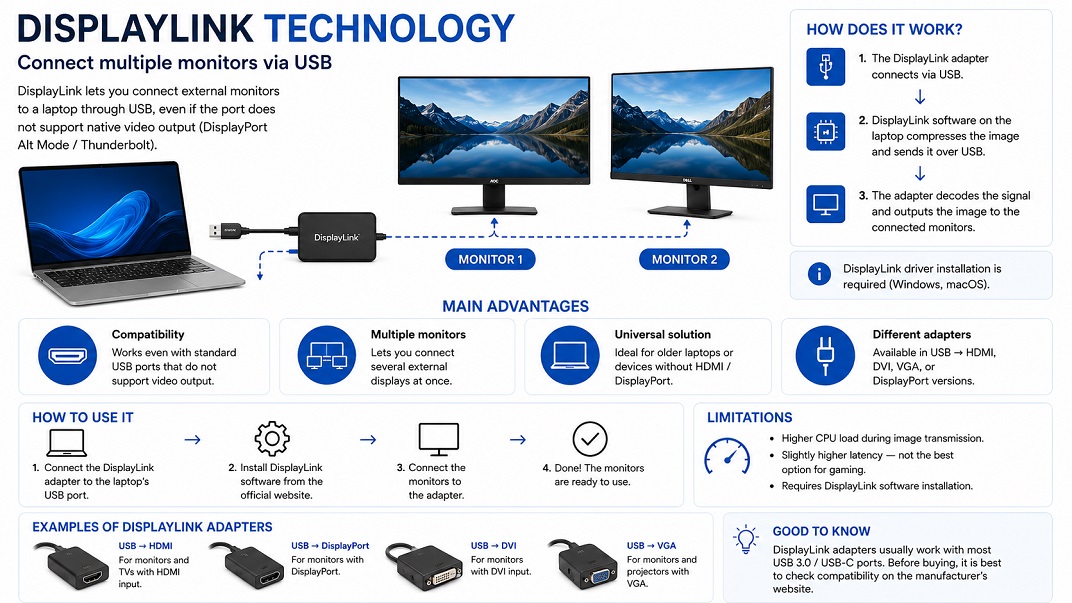
If your MacBook officially supports only one screen but you want more, DisplayLink technology comes to the rescue. It lets you connect additional monitors through special docking stations or adapters. It works like this: for DisplayLink you need to install a driver separately, after which the system “sees” the additional display.
Just keep in mind that this isn't a real, native video output but a software solution. For office work, documents, and the browser it's quite suitable. But for games, video editing, or any tasks where instant response matters, it's better to choose an ordinary direct connection, because DisplayLink can introduce a slight delay.
How to connect two external monitors to a laptop
Sometimes even one external screen isn't enough and you want two at once. But not every laptop is capable of that, and it's worth finding out in advance. Whether you'll be able to connect a pair of displays depends on:
- the laptop's graphics card;
- the processor and its graphics core;
- the number and type of ports;
- support for video output via Thunderbolt or USB-C;
- the presence of a docking station;
- the limitations of the system itself: Windows or macOS;
- the specific laptop model.
That is, if the laptop's capabilities are limited or there are few ports, it may not manage two screens. So first check the capabilities of your model, and only then buy a second monitor.
Options for connecting two monitors
When the laptop supports such a scenario, you can connect everything in different ways. For example:
- one monitor via HDMI, the second via USB-C;
- one via HDMI, the second via DisplayPort;
- both through a single Thunderbolt docking station;
- through a docking station with DisplayLink technology;
- through DisplayPort MST, also called Daisy Chain: the monitors are connected in a chain one after another. But this must be supported by the laptop, the displays themselves, and the system.
Unfortunately, macOS does not support daisy chaining for extending the desktop across multiple displays: the monitors will simply duplicate the image, so this method works only in Windows.
Which method to choose depends on your ports and equipment. The simplest case is when you have both HDMI and USB-C with video output: then each screen is connected to its own connector.
Why an HDMI splitter doesn't extend the desktop
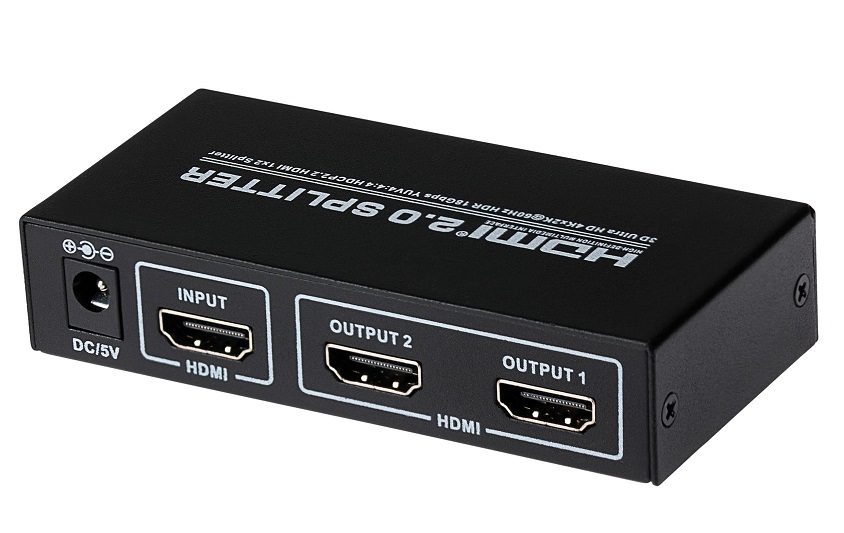
This is worth warning about separately. Many people buy a cheap HDMI splitter, thinking it will send the image to two separate screens. But in fact it does something quite different: it simply duplicates one and the same image on both displays.
That is, you won't get two independent desktops, only two identical copies. And for the monitors to show different windows – that is, to work in “Extend” mode – you need separate video outputs, a docking station, DisplayLink, or another solution that can work with several independent displays.
Simply put, if you want to keep the browser on one screen and a document on the other, a cheap HDMI splitter won't help you. Here you'll be saved by either a docking station or connecting each screen to a separate connector. And if there aren't enough ports, that same DisplayLink technology will come to the rescue.
Yes, two screens are a bit more hassle, but there's twice as much room to work. For it all to work out, the main thing is to take into account the laptop's capabilities and choose a solution suited to them.
Setting up the display in Windows 10 / Windows 11
The monitor is connected, now it's time to set up the image to suit you. Fortunately, in Windows this is done easily, and most of the settings you need are literally a couple of clicks away.
Quick switching via Win + P
The fastest way to manage screens is the Win + P combination. You press it – and a menu with four modes appears on the side:
- PC screen only – the image is shown only on the laptop, and the monitor stays dark.
- Duplicate – outputs the same image to both screens. Just what you need for presentations.
- Extend – turns the second screen into a continuation of the desktop, as if it were one large space across both.
- Second screen only – leaves the image only on the display, and the laptop's screen goes dark.
The most convenient mode is “Extend.” With it you can keep the browser on one screen and a document or email on the other.
Resolution, scale, and refresh rate
If you want to fine-tune everything, go to Settings → System → Display. There, check:
- whether the external monitor was detected at all;
- which resolution is selected;
- which scale is set – this is the size of text and icons;
- which refresh rate is set, in hertz;
- which screen is assigned as the main one.
Usually Windows selects these settings itself, but sometimes they have to be adjusted manually so the image looks the way you want.
Working with the laptop lid closed
A very convenient scenario is when the laptop stands closed somewhere off to the side and works like an ordinary system unit, while you look only at the large monitor. To set this up:
- Connect the charger.
- Connect the external monitor.
- Connect the keyboard and mouse.
- Open the power settings.
- For the action on closing the lid, choose “Do nothing.”
Now the laptop won't go to sleep when you lower the lid. Just keep in mind that when closed it dissipates heat worse and may heat up more. So don't put it right up against a wall and don't block the ventilation openings with anything, otherwise there's a risk of overheating.
On the whole, Windows does most of the work for you. All that's left is to tweak the details a little, and the workspace is ready.
Setting up an external monitor in macOS
On the MacBook it's arranged no more complicatedly than in Windows, it's just called differently. All the settings you need are gathered in one place: System Settings → Displays.
Once there, you'll be able to:
- select the external monitor you need, if there are several;
- change the resolution;
- adjust the scale, that is, the size of text and icons;
- change the refresh rate, if that option is available for your display;
- turn screen mirroring on or off;
- arrange the screens the way they stand on your desk.
In most cases macOS selects the optimal settings itself, but if you wish, they're easy to change manually.
Mirroring or extending the desktop
Here you should distinguish between two modes:
- Mirroring shows the same image on the laptop and the monitor. This is handy when you need to demonstrate something to someone.
- Extending turns the display into additional space, that is, you get more room for windows and programs.
There's also a nice little touch. The arrangement of the screens can be changed by simple dragging. In the settings you move the rectangles of the monitors so that they match their real placement on the desk. Then the cursor will move from screen to screen exactly where you expect.
As you can see, there's nothing complicated in macOS either. A few moves in the settings – and the external monitor works exactly the way you need.
Why the monitor works but the image quality is poor
It also happens that the external display has connected, there's an image, but something is wrong with it: it's blurry, dim, or just not what you'd like. There are several reasons, and almost all are easy to fix.
The image is blurry
If the image is unclear, as if slightly out of focus, the following things are usually to blame:
- the wrong resolution is set in the settings;
- the scale has gone off;
- the image is transmitted through old VGA, which was never famous for sharpness;
- the cable doesn't meet the required bandwidth;
- the monitor isn't running at its native resolution.
Most often it's enough to set the monitor's native resolution, and the image immediately becomes sharp.
No 4K 60 Hz or 144 Hz
Another common situation: the monitor seems capable of high quality or smoothness, but you don't see it. What can get in the way:
- an old HDMI port that simply doesn't support such figures;
- a cable not rated for the required bandwidth;
- a USB-C hub or adapter that limits the refresh rate;
- a monitor that outputs a high refresh rate only via DisplayPort;
- a lower refresh rate set manually in Windows or macOS;
- an outdated graphics card driver.
So if the expected 4K 60 Hz or 144 Hz isn't there, check the cable, the port, and the settings one by one. Usually it's one of the weak links in this chain.
The text on the monitor looks unclear
Sometimes the image overall is fine, but the letters seem slightly blurry or “soapy.” Most often the reason isn't the monitor itself but its settings or the scaling in the system.
The sharpness of the text is affected by:
- the monitor's native resolution;
- the scaling in Windows or macOS;
- the pixel density of the screen;
- the monitor's diagonal and the distance to it;
- the set refresh rate;
- the specifics of how fonts are displayed in Windows or macOS.
First of all, check whether the monitor's native resolution is set. It's usually this that provides the sharpest image. If you choose a lower or non-standard resolution, the system may stretch the picture, which makes the text look unclear.
The type of digital connection – HDMI, DisplayPort, or USB-C – shouldn't in itself make the text sharper or worse, as long as the monitor is running at its native resolution and the right refresh rate. The cable is only worth checking when the image flickers, disappears, artefacts appear, or you can't select the required 4K or 144 Hz.
On a MacBook the text quality especially depends on the combination of diagonal, resolution, and scale. A monitor with a higher pixel density, for example 4K, usually gives sharper text than Full HD on a large diagonal. If necessary, you can use programs like BetterDisplay to get additional scaling modes, but they won't replace the physical pixel density of the screen itself.
So don't rush to blame the cable or the monitor. In most cases it's enough to set the native resolution and choose a comfortable scale to make the text noticeably sharper.
Possible problems and their solutions – a short FAQ
At the end we'll gather the most common issues people run into when connecting a monitor. Everything briefly, so you can quickly find your question and solve the problem right away.
The laptop doesn't see the monitor or says “No signal”
The most common problem. Check one by one:
- whether the cable is plugged in on both sides;
- whether the correct signal source is selected on the display, i.e. the Input Source;
- whether the cable and the port themselves are in working order;
- whether your USB-C supports video output;
- whether the monitor is visible in the Windows or macOS settings;
- whether the graphics card driver is up to date.
Usually some small thing from this list is to blame: most often the cable isn't plugged in all the way or the wrong signal source is selected.
The monitor doesn't display full screen
If black bars remain around the edges of the image or the picture is cropped, try:
- setting the external display's native resolution;
- changing the scaling;
- going into its settings;
- checking the graphics card parameters.
Most often it's a matter of resolution: fix it and the image will fill the whole screen.
The sound comes from the laptop, not the monitor
This happens because, although HDMI, USB-C, and DisplayPort can transmit sound, the system doesn't always switch to the monitor on its own. To fix it, you need to select the right output device manually:
- In Windows: Settings → System → Sound → select the output device.
- In macOS: System Settings → Sound → Output.
That said, if the display has no speakers, there won't be any sound from it in any case.
The mouse crosses over from the wrong side of the screen
A little thing that's annoying: you move the cursor to the right, and it appears on the left screen. The point is that in the settings the monitors are arranged not the way they stand on the desk. In both Windows and macOS, simply drag the rectangles of the screens so that they match the real placement.
After connecting the monitor, the laptop started heating up more
This is also normal: an external screen adds load to the video chip. It's especially noticeable when working in 4K, at 144 Hz, or with several monitors. To keep the temperature under control:
- don't block the ventilation openings;
- put the laptop on a stand;
- check the power mode;
- update the drivers;
- don't keep the lid closed if the laptop dissipates heat poorly.
The main thing is not to let heat build up, and then the heating won't do the laptop any harm.
Almost all of these issues are minor, if annoying. It's worth taking a little time to understand them – and each one can be dealt with on your own, without extra expense.
Conclusion
So that's basically everything about connecting a monitor to a laptop. To keep the essentials at hand, let's gather it all together:
- the simplest connection is HDMI – there's almost no hassle with it;
- if there's no HDMI, USB-C / Thunderbolt or DisplayPort will help;
- not every USB-C transmits video, so it's worth checking in advance;
- for old monitors, active adapters are sometimes needed;
- for two screens, the graphics card, ports, and docking station matter a lot;
- if the screen is dark, first check the cable, the Input Source, the display mode, the resolution, and the refresh rate.
On the whole, there's nothing to be afraid of here. Almost always it all comes down to the right cable, adapter, or a couple of clicks in the settings. So go ahead and get to it, and in just a few minutes the laptop will turn into a full-fledged workspace with a large screen in front of your eyes.