Has your laptop started to make noise, overheat, or slow down for no apparent reason? Don't rush to blame "viruses" or the age of the device. In most cases, ordinary dust is to blame. It gradually accumulates inside, clogs the cooling system, and the device simply can't cope — it overheats, slows down, and sometimes even shuts down while in use.
Fortunately, this is not critical and does not always require a service center. You can clean your laptop from dust yourself. To avoid damaging anything important, all you need is a little patience, the right tools, and clear instructions. You are reading those instructions right now.
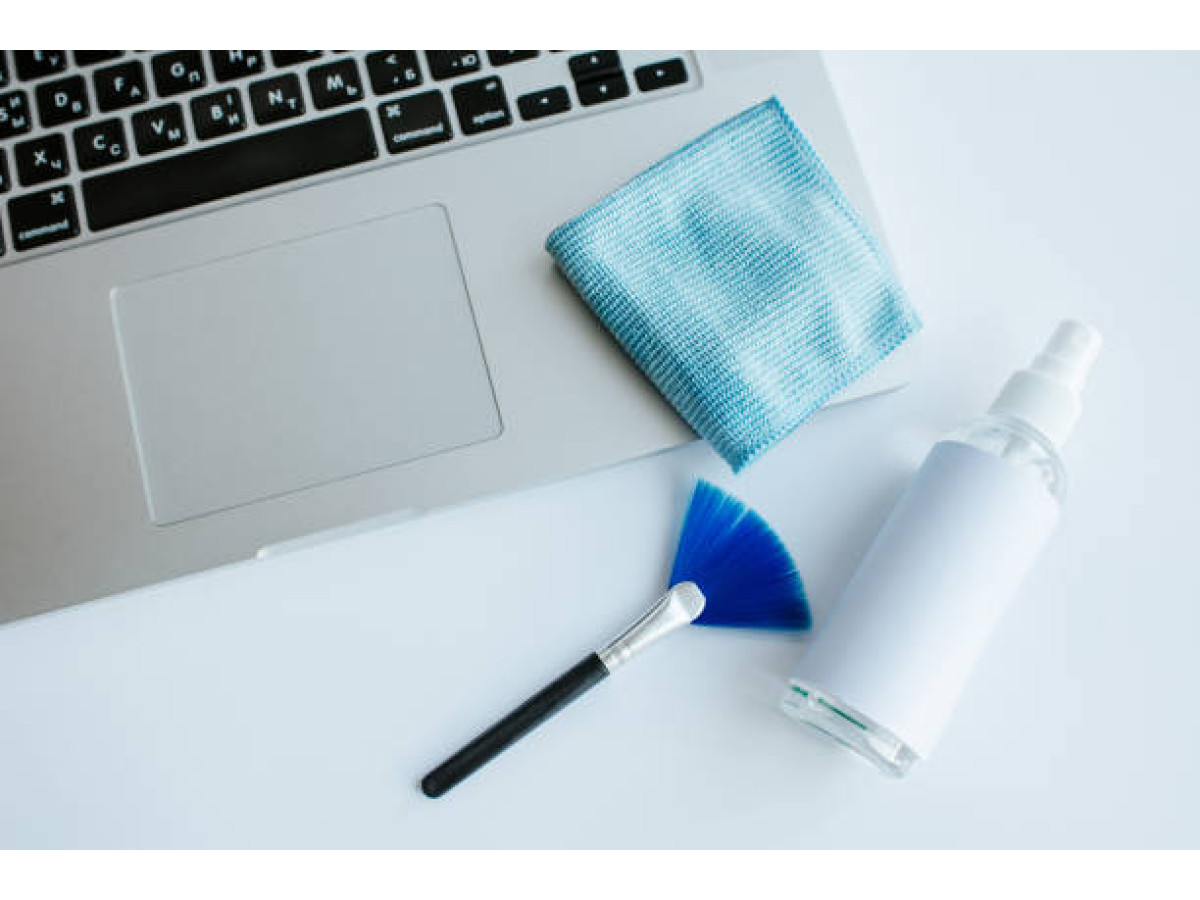
What do you need to prepare?
It's not some boring microsurgery kit, but it's not the time to improvise either. When you open your laptop, you'll understand why. Everything inside is so small that your hands may shake, so don't leave everything open and run to look for a screwdriver.
Therefore, it is better to prepare everything at once:
- A small Phillips screwdriver—most laptops are assembled with small screws.
- Tweezers or something thin—to remove dust balls from hard-to-reach places.
- Compressed air or a mini vacuum cleaner - to blow dust off the radiator and cooler.
- A soft cloth and alcohol solution (or a special cleaning product for electronics) — to wipe down parts without leaving marks.
- A container or magnetic stand for screws - so you don't have to look for them on the floor later.
- Thermal paste - you will need this if you plan to remove the cooling system. The old paste must be removed and new paste applied.
- A plastic card or thin pick - a real must-have! During disassembly, they are useful for prying open the case, as there are often latches that cannot be opened with your fingers. And during assembly, the card will spread the thermal paste over the processor or GPU.
- Good lighting—it's better not to start without it.
This is the maximum you may need. But in reality, it all depends on the laptop itself and how confident you feel. For some, the cover can be removed in a minute, while for others, you have to fiddle with latches and a dozen screws. If you can't find something from this list, don't worry, you can replace most things with something you have on hand. The main thing is not to rush and not to be afraid if something seems unfamiliar. Little by little, everything will fall into place. And yes, patience is sometimes more important than a screwdriver.
How to clean the inside of a laptop - step by step
This requires a little attention and caution. But if you take it slowly and step by step, everything will work out. Here's how to do it:
1. Turn off the laptop and disconnect the charger. Yes, it sounds obvious, but it's better to remind you: the device must be completely turned off and disconnected from the power supply. If the battery is removable, remove it as well. This is for your safety and the safety of the device.
2. Unscrew the bottom cover. Use a small Phillips screwdriver to carefully unscrew all the screws on the bottom. On some models, they may be covered by stickers or rubber feet — don't worry, just find them all. Then, carefully pry the case around the perimeter with a plastic card or pick. If you hear a "click," don't be alarmed, it's just the latches.
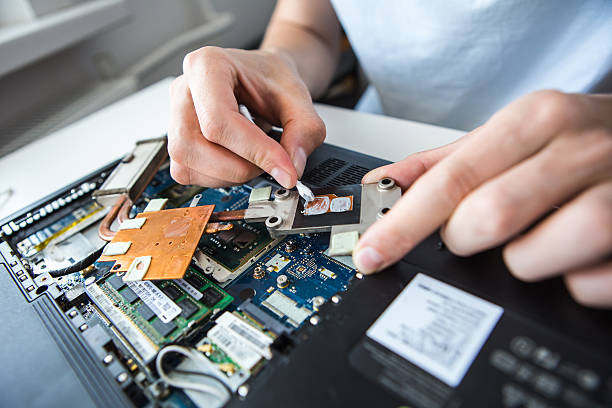
3. Now assess the situation inside. Once the cover is off, see how much dust there is and where exactly. Most often, the dirtiest areas are near the fan and radiator. If you see dust balls, don't be surprised, this is normal.
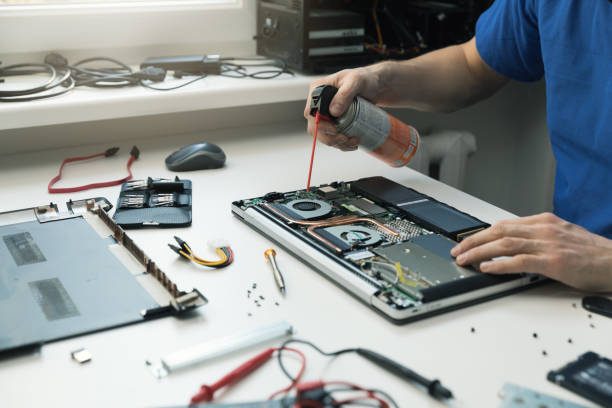
4. Next, start cleaning. You will need compressed air in a can or a mini vacuum cleaner (usually USB vacuum cleaners or low-power models. Under no circumstances should you use a regular household vacuum cleaner. They create a very strong air flow and a high risk of static charge buildup, which can "burn" the microchips). So:
- blow out all the gaps near the fan, radiator grille, and other hard-to-reach places.
- use tweezers or something thin to remove large pieces of dust that cannot be blown away.
- use a soft cloth and alcohol solution (70%–90% isopropyl alcohol) to gently wipe flat surfaces (but do not get into the connectors and microchips). The main thing is to avoid using water!
5. If you are changing the thermal paste, carefully unscrew the cooling system (fan + radiator). Remove the old thermal paste from the processor or GPU (you can use a napkin with alcohol). Apply new paste. Do not squeeze the tube like toothpaste onto a brush. A small drop the size of a bead or pea right in the center of the processor is enough. But do not spread it over the surface with a plastic card, just carefully place the cooling system on top and press it down. The main thing is not to overdo it!
6. When everything is clean, simply reassemble the laptop in reverse order. The latches should click into place, screw in the screws without overdoing it - tighten until you feel resistance, but do not overtighten.
Done. Your laptop is now clean, quiet, and cool. And you're one step ahead! You saw that it's not complicated. Next time, you'll definitely be faster and more confident.
What about "superficial" cleaning?
We've already gone over the serious option — with screwdrivers, disassembly, and thermal paste. But there's another side to it — regular, "everyday" cleaning, which can and should be done regularly.
It seems like no advice is needed here: wipe the screen, blow out the keyboard, wipe the dust off the case. But it's not that simple. Many people either ignore these steps or do them incorrectly, resulting in a smudged screen, sticky buttons, and speakers choking on dust.
So here's a quick and concise guide on what to clean, how to do it correctly, and what to look out for so as not to cause any damage.
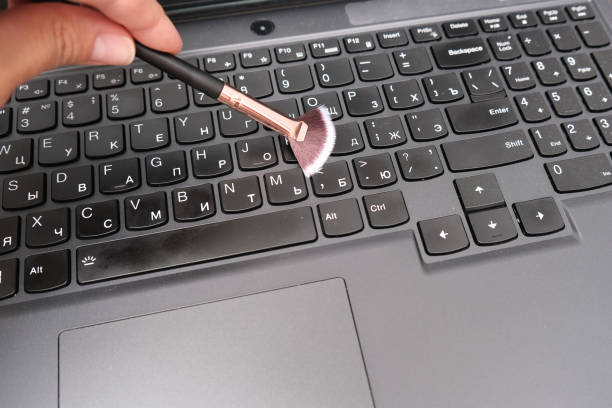
How to clean the keyboard
The keyboard is a real dust collector. Crumbs, dust, hairs—everything flies there. And then the keys start to stick or don't press the first time.
What to do?
- First, turn off your laptop completely. Not sleep mode, but actually turn it off. Next, turn it upside down and shake it a little. Not too hard, but enough to get rid of all the "surprises."
- After that, take a can of compressed air and blow it at an angle between the keys so that the debris can fly out. If you don't have compressed air, just blow on it, but carefully, without saliva.
- Next, wipe the keyboard with a soft cloth. If it is very dirty, put a drop of alcohol solution on the cloth, but don't overdo it.
- You can use an electronics cleaning brush between the keys, but be very careful not to break anything.
And most importantly, get into the habit of wiping your keyboard with a dry cloth every morning. It will take 10 seconds.
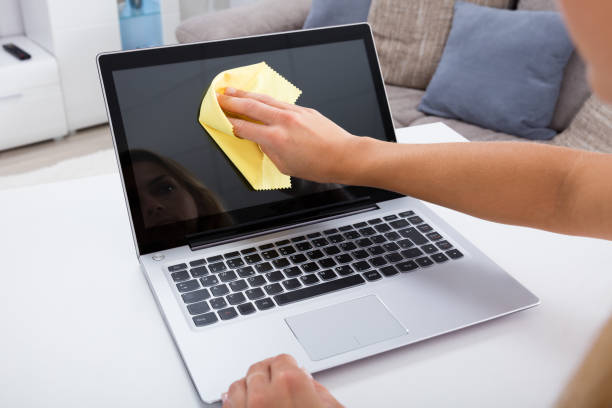
How to clean the screen without streaks
The screen is something you look at every day, so keeping it clean is not just for beauty, but also for your eyes. To keep it free of fingerprints, dust, or smudges:
- take a microfiber cloth—it won't leave lint or scratch the surface;
- moisten it slightly (but do not soak it; when pressed, no liquid should drip from it!) and wipe gently in circular motions.
Never spray liquid directly onto the display—it's better to spray it onto the cloth!
If the stains do not come off, a special cleaner for TFT/LCD/LED screens or a homemade solution will help: water (preferably distilled) + a drop of isopropyl alcohol or even vinegar (use a highly diluted solution, for example, 1 part vinegar to 3-4 parts water).
Cleaning the ports takes 5 minutes, but it will be useful for the whole day
Charging, USB, HDMI, and headphone connectors are all magnets for dust, lint, and even crumbs. If something gets in there, it can cause poor contact or even stop working altogether. And we don't want any surprises like "the charger isn't working," right?
It's simple: take a wooden toothpick or a soft-bristled brush (you can even use an old toothbrush if it's not too stiff). Carefully clean the ports, don't press too hard and don't push anything in too deep.
If you see something stubborn, you can blow on it lightly or use a can of compressed air (but this is not necessary, it's more for professionals).
Ventilation holes are like the lungs of a laptop
Air flows through them, cooling the entire system. But if they are clogged with dust, the laptop starts to heat up, make noise, and slow down. In the worst case, it may simply shut down during operation or something inside may burn out.
What to do? Look at the back or side panel of the laptop - where there are slots or grilles. Take a soft bristle brush or a dry cloth and gently brush them to remove the dust.
If you have a can of compressed air, great, a couple of short puffs and the vents will breathe again. You can use a mini vacuum cleaner with a soft brush. But don't forget to hold the fan blades with something thin (such as a toothpick) so that they don't spin too fast. Excessive speed can damage the bearings or electronics of the fan.
Another important note: do not blow with your mouth - moisture will only make the situation worse.
Conclusion
Make it a habit to clean your laptop from dust once a week, and you'll have less dust and fewer problems. And at least once a year (preferably twice), take a look inside. One deep cleaning a year, and your device will work like new.
This is not about perfectionism, but about common sense. Because if you ignore dust, grease, and dirt, sooner or later your laptop will simply "say goodbye": it will start to overheat, malfunction, or even stop turning on. And then it will be too late for cleaning — you will have to buy a new one. And that's a whole different story.
So, in order not to part with your favorite device, take care of it. From time to time, spend 15-20 minutes on basic cleaning. And if your laptop does happen to "die," don't panic: you can find high-quality refurbished models at a reasonable price on our website.
But of course, it's better to avoid that situation. Because your laptop is, after all, almost like a member of the family.